Blog
Product updates, opinions, and stories from our journey as a bootstrapping startup.
Quick update
Posted on February 29, 2016 by Andy Jones
PennyPipe is excited to keep trucking along. We wanted to bring you a quick update about improvements and features that we keep rolling out.
(1) Shopify handled for QuickBooks
We now support Shopify with QuickBooks. We're very happy to offer this as Shopify is a very popular ecommerce builder. If you'd like to know how much money your Shopify business has made in QuickBooks, we can help. We support orders, fees, taxes, and more.
(2) Better handling of GST tax of income and fees in QuickBooks
PennyPipe can now handle GST taxes with regard to fees in QuickBooks. While calculating GST can be very complicated, QuickBooks helps simplify this. You can now automatically set a GST rate for fees within PennyPipe and we'll carry this into QuickBooks for all the fees which we record as expenses.
(3) Improved mutli-currency support for Stripe accounts
When you accept charges in multiple currencies with Stripe, PennyPipe gets it right. We use the currency of your connected deposit acccount as the currency for transactions within your accounting software. So whether you are sending direct charges to Stripe, or using their invoice and line items, PennyPipe will properly convert any amounts to the amount that your received in your deposit account.
(4) Improved Stripe connect support
We can now ignore charges that are made to your connected Stripe accounts if you so wish. We realized that most Stripe connect customer did not want charges from connected accounts attributed to sales income or otherwise. If you'd like to simply ignore these charges and only apply the charges that are directly attributed to your account, you can now do so with PennyPipe.
As always - you make PennyPipe great. If you have any questions, concerns, or comments, please let us know! You can reach us at support@pennypipe.com or 888-404-2904 during US/Eastern business hours. We're here to help you make sense of your payments gateways and accounting software. Reach out - we can help.
Shopify and QuickBooks supported
Posted on February 4, 2016 by Andy Jones
We're proud to announce the release of our Shopify and QuickBooks integration.
As orders are placed in Shopify, we will create a sales receipt in QuickBooks matching that order to the penny. Here are the highlights:
- Customers from Shopify are created or updated in QuickBooks as necessary (matching by name and email)
- Sales tax rates and codes will be created as necessary if they are not found in QuickBooks
- Shipping and discounts are handled and copied
- The line items from the order are copied verabatim with any variants or properties and tax rates set
- Any order notes are copied as the memo note for the sales receipt in QuickBooks
- Select different deposit accounts based on the payment gateway used if you use different payment methods for your order (i.e. Shopify gateway and PayPal)
If you're using Shopify and QuickBooks to run your business, we do all this automatically to help save you time and sanity. No manual copy and paste or manual entry of orders is necessary. We will sychronize your orders so that you can see in near real-time how much money you've made from Shopify and account for discounts, shipping, taxes, and more.
If you have several Shopify stores, or need to integrate orders from multiple sources, we can help. Our simple pricing is based on charges, not the number of different stores and payment gateways that you use. Your business is one unit and we'll charge you that way. You can add several Shopify stores, add sales made through PayPal, Stripe, or more. Simply "create another pipe".
If you have historical orders from Shopify, we can help move those as well. We move up to 3 months of orders at no additional cost included with our business account ($19 / month). If you have more orders you'd like copied, contact me and we can work out the details.
If you have any questions, please feel free to contact me directly at andjones@pennypipe.com or call during business hours at 888-404-2904.
Stripe disputes now supported
Posted on September 11, 2015 by Andy Jones
We now support Stripe disputes as an option to synchronize with your accounting software.
Disputes don't happen often, but they do happen. Any business running long enough will experience a mis-communication, shipping error, or just an unhappy customers, sooner or later. Since the customer initiates the dispute at their option, disputes bypass any normal refund and remediation process already in place. Disputes are unexpected events that levy their own fees, but we can help make accounting sense at PennyPipe.
Stripe has helped unify the dispute process by charging a single transparent fee of $15 when a dispute happens. Depending on the payment processor, funds may be withdrawn, reinstated, or held at different times. Stripe does a great job of informing customers - and PennyPipe - when these events occur.
We use all the events that occur - fees, withdrawns, and reinstatements - to create the appropriate accounting entries within your specific accounting software. Fees are entered as expenses or purchases. Withdraws and reinstatements are deducted or added to sales as they occur.
Although disputes don't occur often, they are still important to account for. By further checking for disputes, we hope to synchronize your payment gateway with your accounting software correctly to the penny.
7 tips for accounting with Stripe
Posted on September 9, 2015 by Andy Jones

Stripe is a wonderful tool for accepting credit cards of all brands and - very soon - eCheck (ACH) payments online. They have a thorough API that provides real-time information about charges, fees, refunds, and transfers.
If you're an accountant for a small business, chances are some revenue is coming through an online payment service like Stripe, PayPal, Square, or their many competitors. Figuring out where charges, fees, and refunds should be credited/debited is not always clear. Since Stripe is one of the first services that we integrated with PennyPipe, we've had many chances to work with small businesses. Here are a few tips that we've learned that may help make accounting sense of all the data Stripe provides.
1) Consider a Stripe Holding account. Since Stripe deposits money on a 2 day rolling basis for most people, there is an amount of money that is due to you at some future point. Instead of throwing this in accounts receivable or straight into a deposit account, consider creating a separate Stripe Holding account to get an idea about what money Stripe curently has in flux.
2) Stripe has line items for invoices only. If you're looking for line items for invoices or sales receipt, these only exist in certain cases for each charge. If a customer within Stripe has as recurring subscription, or if the customer has line items created then the associated charge will have line items available. The most common case for Stripe is a payment method and an amount. Charges in this case have only the total amount charged and - maybe - a name, email, and description. Stripe is wonderful for simplifying payments, but this may leave much information to be desired if the accounting and ordering process are disconnected.
3) Think about where sales go. You can credit all charges to a generic sales account, or create a separate Stripe sales account. This may be useful, especially if use multiple payment gateway, like Paypal, Braintree, etc. If you're using invoices, or have a tight integration with the order process, you may be able to use the line item information to associate sales to individual items and their associated sales accounts.
4) When Stripe refunds a charge, they refund everything. That's right - the percent fee as well as the per transaction fee all come back to you. I don't if this works across the board, however Stripe behaves this way for my account and all others that I've worked with.
5) Disputes are a series of transactions with wildly different rules. Disputes are a series of related transactions. First, $15 USD is charged for the dispute itself regardless of whether the dispute is won or lost. When the dispute is lost, the full amount of the charge is withdrawn from your rolling balance and you don't receive any fees back. If your rolling balance is not sufficient to cover the dispute, Stripe may withdrawl the amount of money required from your connected bank account. If you win the dispute, Stripe may reinstate the fees, if they were withdrawn at the dispute creation, or do nothing if no amount was held. Each action depends on the card used for payment and the policies they have in place.
6) Check the currencies. Stripe accepts payment in a number of currencies including, US Dollar, Canadian Dollar, Great Britian Pound, among others. If you commonly accept payments from customers using these currencies, make sure multi-currency is enabled within your accounting software and that the correct exchange rate applies. Stripe can charge customers in their local currency and convert to your home currency, however additional fees may apply.
7) Use the description field. Stripe provides a generic description in which you can write anything. Use this to your advantage. If you're billing for an invoice, place the invoice number there. If you're billing for an order, place the order number or a short description of the order in the description. If you ever need to come back to Stripe to figure out what belongs where, this description will help you keep your sanity.
There is no one "right" way to account for Stripe charges, fees, refunds, etc as each person's business is slightly different. Hopefully these tips will help you setup a Stripe system that is manageable as your business grows. And, if we can help at PennyPipe - please give us a shout!
Did these tips help? Show some love and follow us on Twitter or sign up for a free 14 day PennyPipe trial.
How to properly use google adwords: the cat in a bucket campaign
Posted on September 3, 2015 by Patrick Sheegog

So, we're not marketing experts at PennyPipe. We're two techy people trying to solve accounting problems and save folks time. That being the case, we're always exploring new ideas that may or may not have the greatest returns. Enter the "Cat in a bucket" Google adwords campaign.
Would you say no to that face?
So you need to market a product that helps people but don't have much of a budget. Maybe you're bootstrapping like we are or just trying to run lean. There are certainly easy wins like online communities where people are begging for help, your circle of peers that always listen to your ideas, and local organizations where you already have your roots. What about those cold introductions where you just have to jump and hope you land on your feet? Google adwords is one way to go about that, if you do it the right way.
Why Adwords?
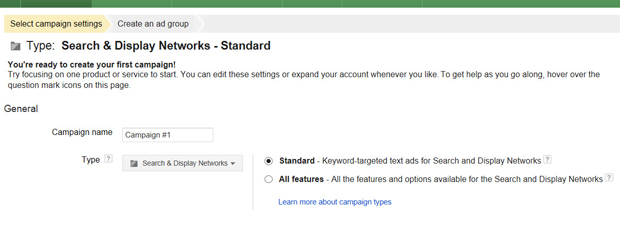
Google adwords has a great history of getting eyeballs on new products for a relatively low price but its glory days are well behind it. We wanted to see what all the fuss is(was) about and gave it a shot anyways. I mean, it's Google right? We chose a "standard" Google Adwords campaign (a mistake) and started choosing keywords we've been hammering on the blog "integrate, sync, payment gateway, accounting" all of that good stuff. After a little bit of tweaking we used the neat tool that Google Adwords uses to scrape content off your website to pick an appropriate color, font, and image to use in your ad.
Google created this:
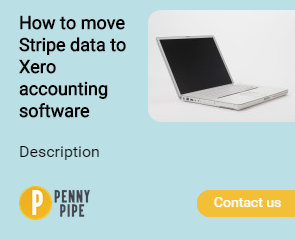
"Not bad Google robot", I said to myself, but then I thought about how I feel when an ad on the side of my screen. I don't care 98% of the time. The 2% is when animated dinosaurs pop up awkwardly. So, thinking of this adorable Woofoo dinosaur ad I feverishly looked through Google's stock photo collection. Among the few gems I also found some embarrassingly outdated images (exhibited below shamelessly).


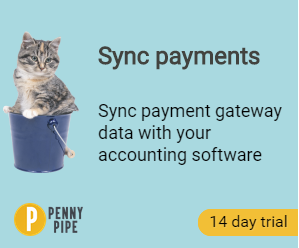
And then I found this beautiful creature:

It was a cat in a bucket, and I loved it.
I thought to myself, who wouldn't click on that adorable cat in a bucket; the internet loves cats sitting in things. So I feverishly polished the text and pushed our Google Adwords ad live, letting it flow through the internet for a few days before checking back in.
In the end, I was right about the internet loving cats. We received 20% more clicks with the cat in the bucket campaign then our normal graphic. The problem is these users were only interested in this cat in a bucket and not truly interested in the product. The bounce rate was immensely high, around 90% and most users didn't stay long enough to read more than the first sentence of our website. The valuable lesson here is not just driving random cat loving clicks to your site, but attract your target market. In our case it was business owners who need to automate accounting reconciliation in the cloud. That being said, I do think this campaign could have been successful if we did a little bit more leg work.
Turning click-bait to a connection
To make these Google adventurers feel more at home we could have made a landing page that connected with our visitor. On that page we would come clean, admit we were being dishonest with this click-bait bucket cat and then try for a sale or even a recommendation. Something like an infographic leveraging cats and buckets to explain our process of reconciling accounting data. This kind of sense of humor and commitment to the joke could have showed our human side and helped us connect with these random visitors. Emotional connections in advertising create brand evangelists for the future not to mention it may just get your cat in a bucket landing page linked across the internet in a viral fashion.
Optimimizing some simple Google Adwords settings
To be fair this ad was doomed to fail, to no fault of our adorably contained feline friend, but because our "Campaign settings" in Google Adwords were not ideal.
1. You have an option to select the "global display network", "google search traffic" or both. We naively chose "both", because more is better right? Well, we should have read up that you need to make very targeted ads for each network. Simply put, if you are trying to sell a product with a limited marketing budget then favor "search". If you are doing public awareness for your brand or selling a product with a lengthy sales process then go with "display network". Here's a very informative article about the differences.
2. Don't go with the "standard" settings, click "all features" instead. This will allow you to select target languages. In one example, if you're in the US the standard settings will show your ad in Canada with French language audiences also. We could have easily saved some money if we had just targeted the right audiences of high value leads. This is an article that goes further into the details along with a few other helpful tips.
Best of luck in your Adwords adventures, here's to hoping you could gain something from our (adorable) mistake.
Did you learn something new or, dare I say, feel entertained? Show some love and follow us on Twitter.